Zoom Participant Guide
The Zoom integration with UNM Canvas means that instructors can create online meetings inside their courses, making it easy for students to find and access them. Below are resources for students needing to check their equipment, join Zoom meetings from Canvas, get help signing in to UNM Zoom, meeting controls, and more.
Before Your First Class
Video conferencing makes heavy demands on your computer and your internet connection. For the best experience, you will need equipment that is relatively new, software that is up to date, and a fast internet connection--preferably, via an ethernet cable plugged directly into a router. Wireless connections can work, but are not the best choice. In terms of speakers and microphones, for the best experience, we recommend a USB headset (~$40).
General Requirements
- A relatively new computer running software that is up to date
- A stable robust internet connection – preferably via an ethernet cord plugged directly into a router
- Speakers and a microphone – ideally a USB headset (~$40)
- A webcam or HD webcam – built-in or USB plug-in
Supported Operating Systems
- Mac: OS X 10.9 or later
- PC: Windows 7 or later*
*Note: Devices running S Mode are not supported. - Linux: See updated list from Zoom
- Mobile:
○ iOS 8 or later
○ iPadOS 13 or later
○ Android 5.0 or later
Supported Browsers
- Mac: Safari7+, Firefox 27+, Chrome 30+
- PC: Edge 12+, Firefox 27+, Chrome 30+
- Linux: Firefox 27+, Chrome 30+
For more detailed information, see the complete list provided by Zoom:
https://support.zoom.us/hc/en-us/articles/201362023-Zoom-system-requirements-Windows-macOS-Linux
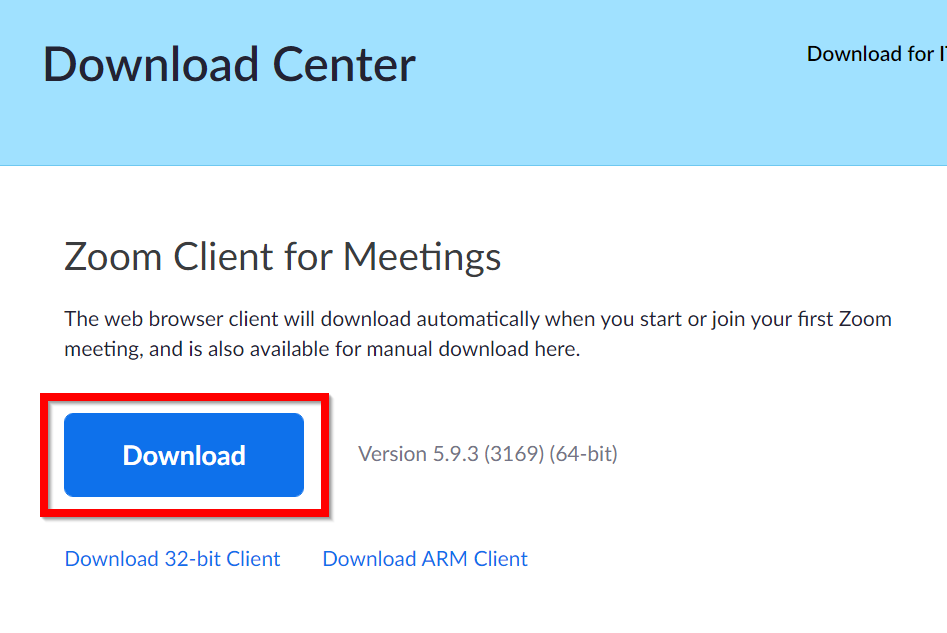
- Visit https://unm.zoom.us/download.
- Click Download.
- Follow your browsers prompts to open the downloaded installer.
- Once opened, Zoom will initialize and install the application.
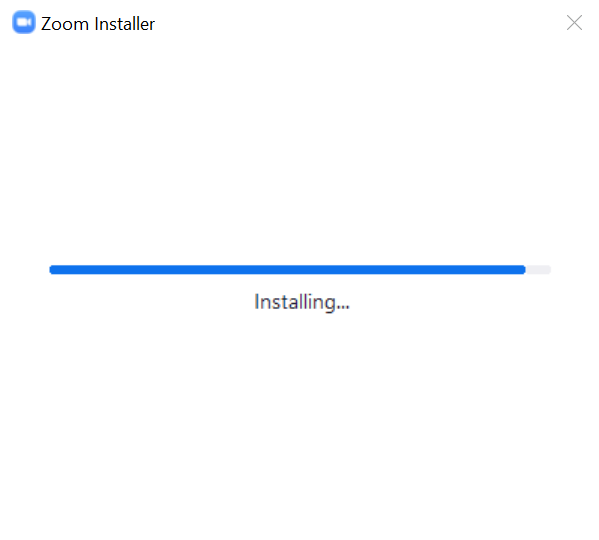
- Click Done.
Android:
- Open the Google Play Store.
- Search for ‘Zoom Cloud Meetings’.
- Find and tap on ZOOM Cloud Meetings by zoom.us.
- Tap Install.
- Once the app installs, tap Open.
For help with signing in, see ‘Sign In Using Zoom Application - Mobile’ below.
iOS or iPadOS:
- Open the Apple App Store.
- Search for ‘Zoom Cloud Meetings’.
- Find and tap on ZOOM Cloud Meetings.
- Tap Get.
- Once the app installs, tap Open.
For help with signing in, see 'Sign In Using Zoom Application - Mobile’ below.
Signing into the UNM Zoom service will create an account associated with your UNM email. If you signed up for an account using https://zoom.us/ and your UNM email address, migrate to UNM Zoom before following the steps below.
- Launch the Zoom application. Need to install Zoom? See 'Download the Meeting Software - Zoom for Mobile' above.
- The ‘Join a Meeting/Sign in’ window will appear. Click Sign In.
- A new ‘Sign In’ screen will load. Click Sign In with SSO or SSO.
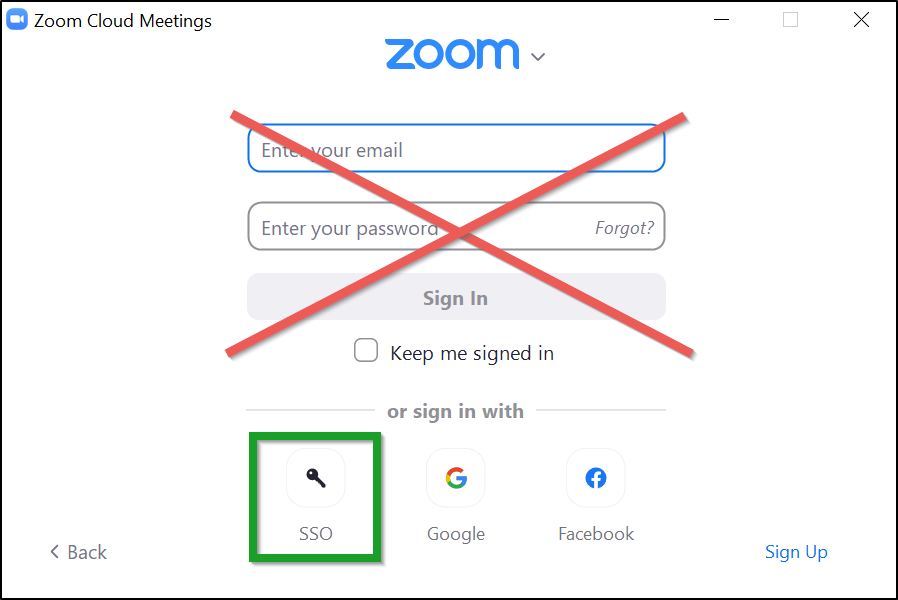
- In the next window, type ‘unm’ in the text field and click Continue.
- If you are prompted to sign in after clicking the “Continue” button, you must enter your full UNM email address (e.g., <your UNM NetID>@unm.edu). Do not just put your NetID. You must add the @unm.edu to the end.
- Enter your password.
If this is your first time signing in, you will be prompted to confirm your email address. Click confirm email and check your email for a confirmation from no-reply@zoom.us.
- Your browser session may prompt you to Open Zoom.
Signing into the UNM Zoom service will create an account associated with your UNM email. If you signed up for an account using https://zoom.us/ and your UNM email address, migrate to UNM Zoom before following the steps below.
- Launch the Zoom application.
- Tap Sign In in the bottom right.
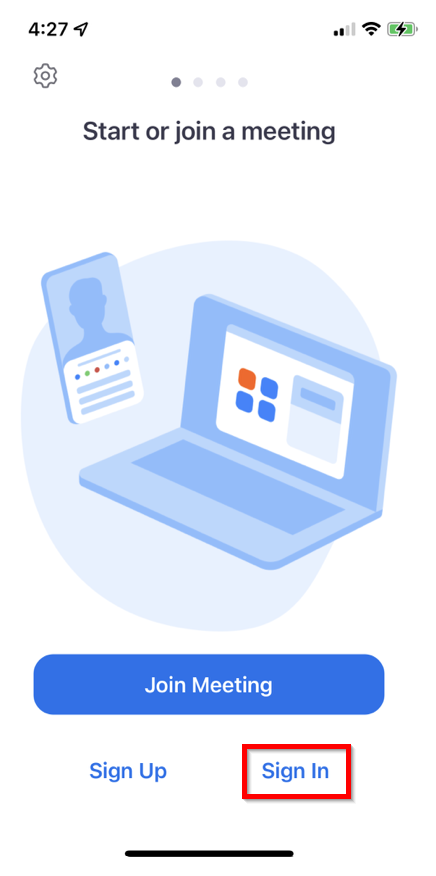
- Select ‘Sign In with SSO’.

- In the next window, type “unm” in the text field and tap Continue.
- If you are prompted to sign in after clicking the “Continue” button, you must enter your full UNM email address (e.g., <your UNM NetID>@unm.edu). Do not just put your NetID. You must add the @unm.edu to the end.
- Enter your password.
If this is your first time signing in, you will be prompted to confirm your email address. Click confirm email and check your UNM email for a confirmation from no-reply@zoom.us. If you are redirected to your Zoom profile, retry step 4 to force the app to launch.
Check your computer audio/video prior to joining each Zoom session:
* Audio - https://support.zoom.us/hc/en-us/articles/201362283-How-Do-I-Join-Or-Test-My-Computer-Audio
* Video - https://support.zoom.us/hc/en-us/articles/201362313-How-Do-I-Join-Or-Test-My-Video
Need more help? Use see Zoom’s support resources for Audio and Video. You can also call UNM Canvas Support - 505-277-0857, toll-free at 1-877-688-8817.
Your First Class Session and Beyond
The Zoom Meetings link you will need to join a scheduled Zoom session should be in the Course Navigation along the left. If you can’t find it, ask your instructor. If you have not already done so, follow the instructions above to download the Zoom software and log in.
- Click the "Zoom Meetings" link found in the Course Navigation.
- To the right of the correct session, click "Join."
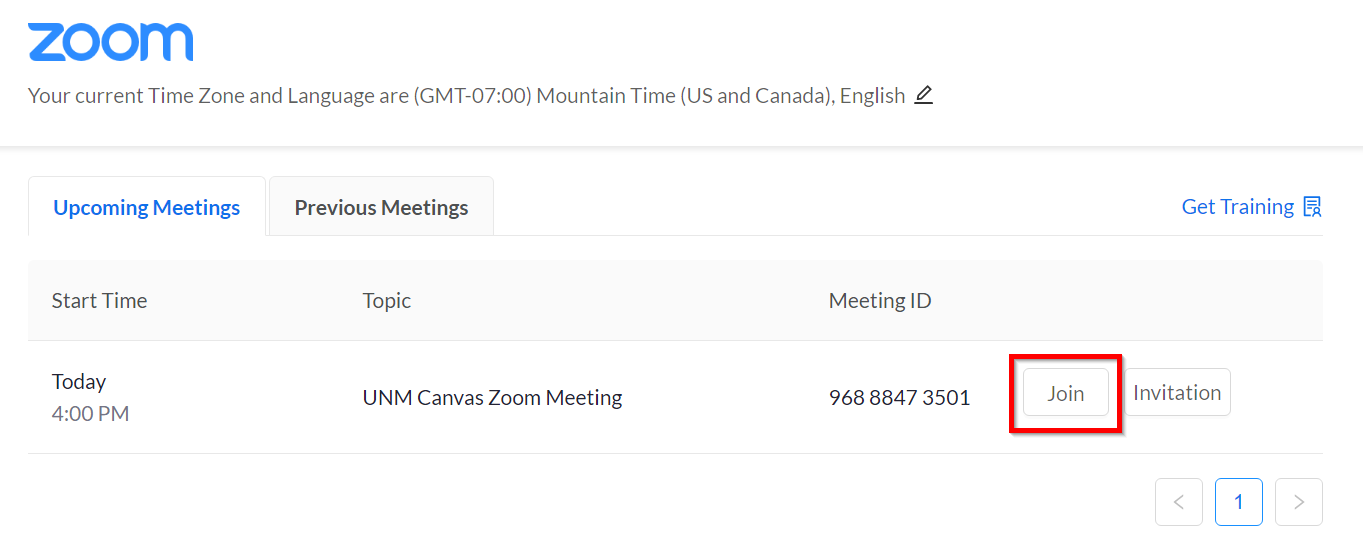
- Follow your browser prompt to launch the Zoom software.
Note: If you are presented with a prompt from Zoom to ‘Sign in to Join’, be sure you are not signed into Zoom with an account not associated with UNM and that you have followed the steps in the Before your first Class: How to Sign in.
- The Zoom application should launch your meeting.
For the best possible Zoom meeting experience, we recommend the following:
- Internet Connection –
When possible, used a wired network connection, rather than Wi-Fi. This will provide a more stable, better quality connection for your session. Close any other programs that are not strictly required for the meeting. For example: internet radio, streaming videos or large downloads/uploads can slow down your connection and negatively impact your experience. - Check your equipment –
Test your computer audio/video prior to joining each Zoom session:
* Audio - https://support.zoom.us/hc/en-us/articles/201362283-How-Do-I-Join-Or-Test-My-Computer-Audio
* Video - https://support.zoom.us/hc/en-us/articles/201362313-How-Do-I-Join-Or-Test-My-Video
- Help contribute to a quiet environment –
When possible, you should try to join meetings from a location without a lot of background noise or other distractions. To help with audio feedback, you should consider buying and using an inexpensive USB headset or earbuds rather than using the microphone and speakers built into your computer. Mute your microphone if you are not talking, especially if you are in a noisy area, etc.
- The Chat Window and Raise Hand Feature –
The chat window is typically available as a means to ask questions. Keep in mind instructors may not be able to monitor the chat while in the middle of instruction, so you should not spam your question or resort to all capital letters as a means of getting their attention. Use the Raise Hand feature to draw more attention to your question in chat or as a means of asking to speak.

Audio/Mute Audio button - Control when other participants hear your microphone. Toggle the microphone icon to select Audio or Mute Audio.
Note: For audio device selection and more options, next to Mute / Unmute click ^ > Audio Settings...
Video/Stop Video button - Control when you appear on camera. Toggle the camera icon to start or stop your video.
Note: To switch video devices and for more video options, next to Start / Stop Video click ^ > Video Settings.
Participants - Opens a view of everyone in the meeting. It also allows controls for renaming yourself (if allowed by meeting host) and sharing your pronouns.
Chat - Send a message to one person (Direct Message) or to all participants.
React – Communicate without interrupting through emojis (e.g. clap, heart, laugh) or Raise Hand to draw attention to yourself.
ShareScreen – Let others view your desktop (everything you have open) or select a specific application to share (e.g., Microsoft Word).
More – Depending on how large your Zoom meeting window is, other controls may collapse into the More menu.
Leave – Exit the meeting. The meeting will continue for other participants. Only the host can end a meeting for everyone.
During a session you might be asked to mute your microphone until you have a question or comment. This helps to minimize audio feedback. Mute your microphone by clicking on the audio icon located in the lower left-hand corner of the menu bar.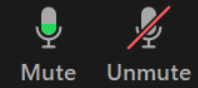
Unable to hear or be heard by others in the meeting? Click ^ next to the audio button. Select a different microphone and/or speaker.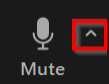
If your selections look correct and you are still having problems, click Test Speaker & Microphone…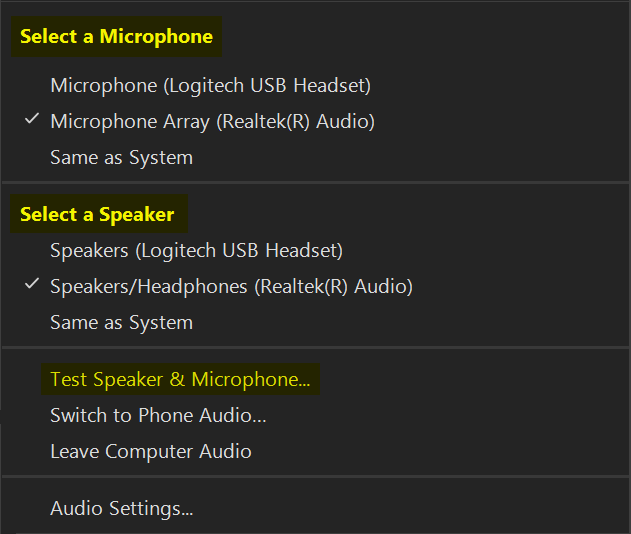
The Start Video / Stop Video button allows you to control when you appear on camera. Toggle the camera icon to start or stop your video.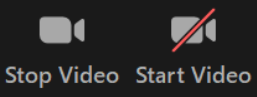
To switch video devices and for more video options, next to Start / Stop Video click ^ > Video Settings.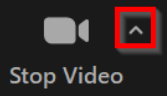
Mouse over the bottom of your Zoom window to reveal the Menu Bar. Click Participants to see a list of all those present in the meeting.
Your name will appear at the top of the list. To change how your name appears in the meeting, hover over your name > More > Rename. Meeting hosts can choose to remove this ability.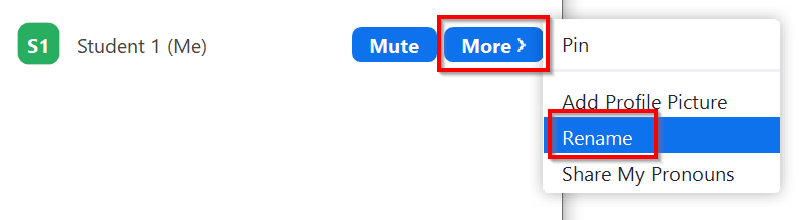
If you have configured your UNM Zoom profile to share your pronouns, you can use the participants menu to control how this is displayed to others in the meeting. To control how your pronouns are shared, hover over your name > More > Share/Unshare My Pronouns.
There are 5 video layouts or views for computers and laptops: Windowed, Full Screen, Gallery, Thumbnail, and Side-by-side (if content is being shared). By default, Zoom meetings open in windowed mode (i.e. resizable).
The Zoom Support Site also has a page explaining these options.
For iPads and other mobile devices, there is Gallery view and Active Speaker View. See the Zoom page on this topic (iPad is at the bottom) for more details.
Full-Screen Mode
To enter and exit "full screen mode” double-click anywhere on the video meeting screen or click View > Fullscreen from options in upper-right hand corner of the meeting window.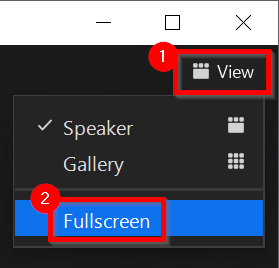
Note: In older versions of MacOS, you must use the Top Menu bar. Click Meeting > Enter Fullscreen.
Speaker View
To view your meeting in "Speaker View”, click View > Speaker from options in upper-right hand corner of the meeting window. This view will display the active speaker in a large video window with your and up to 5 other thumbnails along the top.
Gallery View
To view your meeting in "Gallery View”, click View > Gallery from options in upper-right hand corner of the meeting window. "Gallery view" lets you see all participants (up to 25 or 49) in the same window. If you have more participants in the meeting, additional pages will be generated and can be cycled through using the right or left arrows.
Floating Thumbnail Window
If you need to see the rest of your screen, you can switch to a small floating thumbnail. To launch this view, click on the minimize icon for the entire window. Now you can move the thumbnail around freely. This view will only work if screen sharing is not active.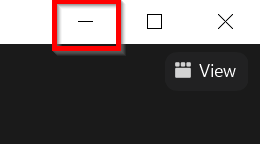
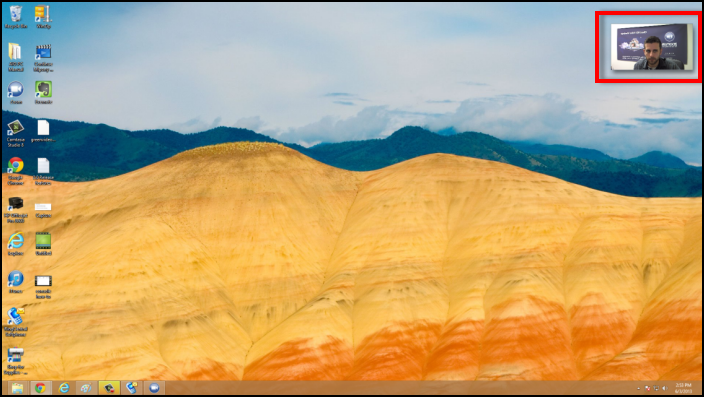
To switch back to the windowed mode (your original size), click the Expand icon you see along the bottom of the Mini-Window (not pictured).
Side-by-side View
Side-by-side splits the view of shared content and participant video vertically across your Zoom meeting window. This view also allows you to adjust the location of the separator to make one side larger or smaller. Once content is being shared, Side-by-side will be available in your View options.
What is a Breakout Room?
A Zoom breakout room is a separate session from the main meeting room where you can work with a smaller group as assigned by your instructor.
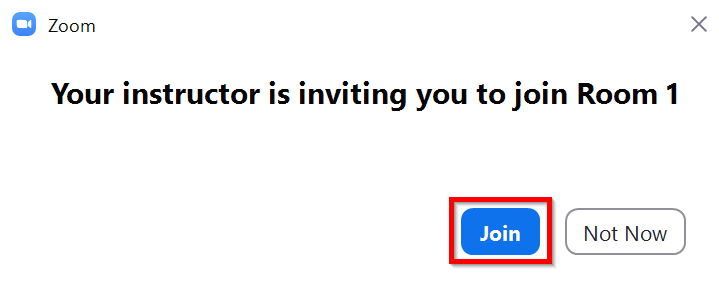
Zoom Breakout Session
Once the Breakout sessions have been initiated, participants will be asked to join their particular Breakout Room. When your session invitation appears on the screen, click Join.
How do I ask for Help in a Breakout Session?
If you need assistance in your breakout session, you can use the Ask for Help feature to alert the instructor.

Clicking Ask for Help generates a prompt to alert the instructor. Click the Invite Host button.
For help, please visit our Canvas Info Support page,
Or call 505-277-5757 / Toll-Free: 1-877-688-8817.
Check your computer's audio/video equipment prior to joining each Zoom session:
* Audio - https://support.zoom.us/hc/en-us/articles/201362283-How-Do-I-Join-Or-Test-My-Computer-Audio
* Video - https://support.zoom.us/hc/en-us/articles/201362313-How-Do-I-Join-Or-Test-My-Video
Relevant Documentation (Students):
Zoom - Schedule Meetings During
Instructor's Appointment Times
