Hosting A Zoom Meeting
All UNM Canvas instructors can use UNM Zoom to host online meetings inside their courses. This guide covers the steps you will need to successfully host a meeting. Before you begin, please familiarize yourself with the best practices and classroom management tools on the UNM Zoom Meeting Host Responsibilities page.
If you have not already done so, make the Zoom Meetings tool visible in your course navigation, and use it to schedule a meeting, as covered in How to make the Zoom Meeting tool visible in a Canvas Course and Managing Zoom Meetings inside UNM Canvas.
As a Zoom Meeting Host, How Do I:
Start A Meeting
How to grant access from the Waiting Room
Control a meeting (toolbar overview)
Mute/unmute my microphone or adjust audio
Start and stop my video (webcam)
Record a meeting
Share my screen
Use Polling
Use Breakout Rooms
End a Meeting
How to grant access from the Waiting Room
When the Waiting Room is enabled for your meeting, you can choose when students are able to join. This added control allows you to screen and control the flow of students admitted to your meeting. Best practice is to open the Participant panel during your meeting so that you have a sense of who is present or who might be waiting in the waiting room if you have one enabled. You might want to consider adding an Alternative Host to help monitor things (the Waiting Room, questions that come via the chat window, etc.).
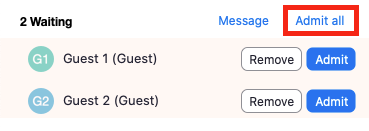
Click the Participants icon – Admit
![]()

Click the Participants icon – Admit All
![]()

For more information see, this short video: How to use Zoom Waiting Rooms. Also see Waiting Room.
How does a host control a meeting (toolbar overview)?
Zoom offers a range of tools hosts can use to manage their meetings. ![]()
From left to right, the default host controls for Zoom are Audio (Mute/ Unmute your microphone and Audio Settings), Video (Start/ Stop your webcam and Video Settings), Participants, Chat, React, Share (Screen), Host tools (Security and Participant activity tools), Breakout Rooms, Show captions, More (Record, Polls/Quizzes, Notes, and Live on Facebook, Workplace, YouTube, or Twitch), and End (End Meeting for All and Leave Meeting).
For more, see What Are the Host Controls.
How do I mute and unmute my microphone or adjust audio?
Audio / Mute Audio button allows you to control when students hear your microphone. Toggle the microphone icon to select Mute or Unmute.
TIP: You also have the option to Mute All Participants -- that button is at the bottom of the Participants panel.

For audio device selection and more options, next to Audio click ^>Audio Settings...

For details on how to configure or test your audio, see Testing computer or device audio.
How do I start and stop my video (webcam)?
The Video / Stop Video button allows you to control when you appear on camera to your students. Toggle the camera icon to start or stop your video.

To switch video devices and for more video options, next to Video click ^ > Video Settings.

For details on how to configure or test your webcam, see Testing your video.
How do I record a meeting?
You can choose to record a meeting automatically when setting up a session. Hosts can also start and stop Zoom meeting recordings on the fly using their host controls. Note: you may need to mouse over the bottom part of your Zoom window to reveal the toolbar.

Audio and video recordings of class meetings may represent sensitive data; please review the guidelines for protecting student privacy (FERPA). For more detailed information on using the tool, see Recording.
Zoom Recordings and UNM Canvas - UNM Zoom meetings you record to the Zoom cloud automatically upload to your (the meeting host’s) Kaltura My Media tool inside UNM Canvas. From My Media, you can edit and securely share recordings with your students.
How do I share my screen?
Before the meeting begins, consider what you want to share. Take a moment to close programs and windows you will not be using.
When you are ready to begin sharing you may need to mouse over the bottom of your Zoom window to reveal the host controls (toolbar).
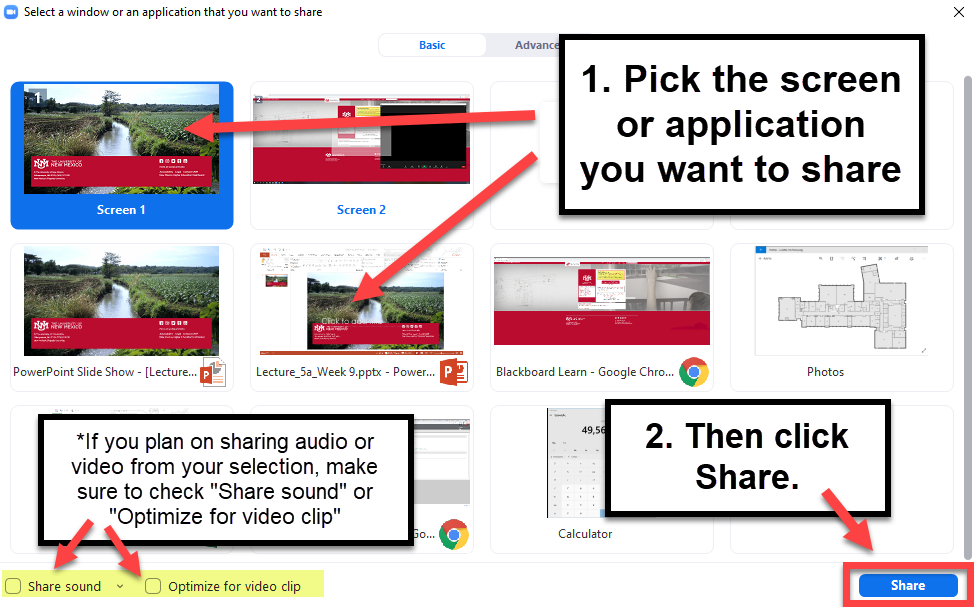
Click Share Screen.

Zoom will show all available screens (monitors) and all open program windows. Click to select the one you want. Then click Share. Note: If you plan on sharing audio or video from your selection, make sure to check the box for "Share sound" and "Optimize for video clip" respectively.

You should see a green indicator bar: You are screen sharing. To stop, click Stop Share to the right of it. Note: the controls may be at the top of your screen, instead of the bottom.

If you would like to allow participants to share their screens, click Security, Allow participants to: Share Screen.
For more detailed information, see Sharing your screen, content, or second camera.
How do I use Polling?
We recommend that you create your meeting polls before you start your meeting. See Managing Zoom Meetings in UNM Canvas – Advanced Topics for details on creating polls.
To launch a poll created ahead of your meeting:
- Once your meeting is underway, click Polls in your meeting controls.
- Select the poll you would like to launch.
- Click Launch Polling.
The participants in the meeting will now be prompted to answer the polling questions. The host will be able to see the results live.
- Once you would like to stop the poll, click End Poll.
- If you would like to share the results to the participants in the meeting, click Share Results.
To create and launch a poll during your meeting:
- Click Polls in your meeting controls.
- Click Add.
This will launch a browser session allowing you to edit your Zoom meeting. - Scroll to the bottom of the page, under Poll click Add.
- Enter a title and your first question.
- (Optional) Click the Anonymous check box to make the poll anonymous, which will keep the participant's polling information anonymous in the meeting and in the reports.
- Select whether you want the question to be single choice (participants can only choose one answer) or multiple choice (participants can choose multiple answers).
- Type in the answers to your question and click Save at the bottom.
- If you would like to add a new question, click Add a Question to create a new question for that poll.
- Click Save.
- In Zoom, click Launch Polling.
How do I use Breakout rooms?
Zoom supports a variety of options for Breakout Rooms, making it possible to split students into separate sessions which you as host can join at any time.
For those who would like to set things up in advance, you cannot create breakout room pre-assignments when scheduling a new meeting using the Zoom tool within UNM Canvas. There are two workarounds.
(Option 1) - Create your Zoom meeting in UNM Canvas, then edit it at https://unm.zoom.us/meeting#/upcoming to enable Breakout Room pre-assignments.
(Option 2) - Create the meeting at https://unm.zoom.us/, configure the Breakout Room pre-assignments, then import the meeting into your Canvas Course. For help with importing, see “Students not seeing a scheduled meeting” in Troubleshooting & FAQ.
How do I end a meeting?
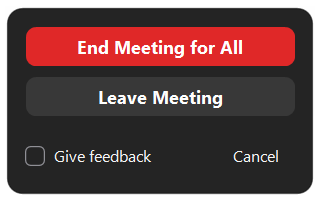
From the Host controls toolbar, click End (only available to the host and alternate hosts).

You have two options:
End Meeting for All: End the meeting for yourself and all participants.
Leave Meeting: Leave the meeting. You will be prompted to assign a host so that the meeting can continue.

Note: Leaving the meeting without ending it may impact the length of any ongoing cloud recordings.
Relevant Documentation (Instructors):
Zoom - How to Make the Zoom Meeting Tool Visible in a Canvas Course
Zoom - Scheduling Zoom Meetings in UNM Canvas
Zoom - Creating Appointment Times for Students
Zoom - Calendaring
Zoom - Edit or Delete a Zoom meeting
Zoom - Start a Zoom meeting from UNM Canvas
Zoom - Hosting a Zoom Meeting (meeting controls, polling,
breakout and waiting rooms)
Zoom - Recordings and UNM Canvas
Zoom - Manually Upload a recording from your local computer
Zoom - Troubleshooting & FAQ
