Manually Upload a recording from your local computer
If you recorded your Zoom meeting to your local machine, you can upload the recording to your UNM Canvas course using My Media and share it by linking it using one of two methods provided on the Zoom Recordings and UNM Canvas page.
Note: This is not the preferred method or expected way to handle Zoom recordings in Canvas. For the preferred methods, please see Zoom Recordings and UNM Canvas.
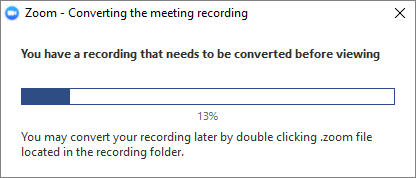
- After the meeting has ended, Zoom will convert the recording so you can access the files.
Note: If you started and stopped recordings multiple times during a meeting, Zoom will convert those recordings as individual files.
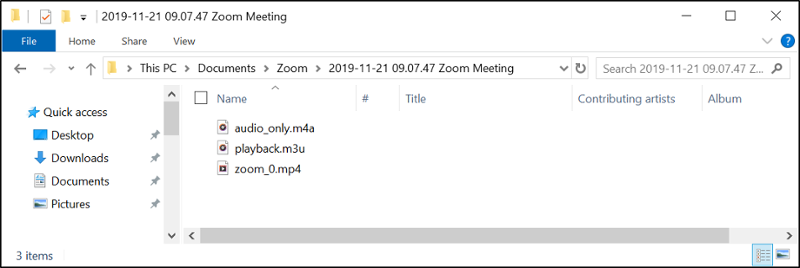
- Once the conversion process is complete, the folder containing the recording files will open.
Note: By default, the audio/video file (MP4) will be named Zoom_0.mp4. The audio only file (M4A) is named audio_only.m4a.
- Create or navigate to the Canvas item you wish to add your Zoom recording to.
Note: If this is an existing item, click Edit to access Canvas’ Rich Content Editor. You can add Zoom recordings to Pages, Announcements, Assignments, or Discussion Posts, typically, anywhere Canvas shows the Rich Content Editor, a Zoom recording can be added.
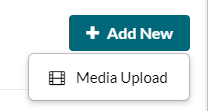
The steps below explain how to link a video as an individual item on a content page or in a learning module. If you are using the Media Gallery, follow the appropriate instructions and choose ADD NEW> Media upload.
- Click Embed Kaltura Media (
 ) from the Rich Content Editor’s toolbar.
 - This takes you to an area called My Media. My Media stores all the materials you have uploaded/ created.
- Add New/ Media Upload.
- The Upload Media Screen will load. Drag and Drop. Or click Choose a file to upload > Browse your computer > Select a file and click Open.
- The upload process will begin immediately.
- When finished, modify the Name, add Description and Tags. Click Save.
- The green bar at the top will indicate that your changes have been saved (not pictured). Click Save and Embed.
- Your selected media will be added to content editor available for preview.
- Click Save or Save & Publish.
Relevant Documentation (Instructors):
Zoom - How to Make the Zoom Meeting Tool Visible in a Canvas Course
Zoom - Scheduling Zoom Meetings in UNM Canvas
Zoom - Creating Appointment Times for Students
Zoom - Calendaring
Zoom - Edit or Delete a Zoom meeting
Zoom - Start a Zoom meeting from UNM Canvas
Zoom - Hosting a Zoom Meeting (meeting controls, polling,
breakout and waiting rooms)
Zoom - Recordings and UNM Canvas
Zoom - Manually Upload a recording from your local computer
Zoom - Troubleshooting & FAQ
